PEACHTREE -- REPORTS

Reports
For financial statements and reports review we click on “REPORTS” in menu bar and click ‘Financial Statements’.


As we click on ‘Financial Statements’ the following default window will appear:


This above window contains the option of all financial reports and statements including:
Ø Accounts Receivable
Ø Accounts Payable
Ø Payroll
Ø General Ledger
Ø Financial Statements
Ø Inventory etc.
Now we take an example as if we select “Balance Sheet” from ‘Financial Statements’. The following window will appear:


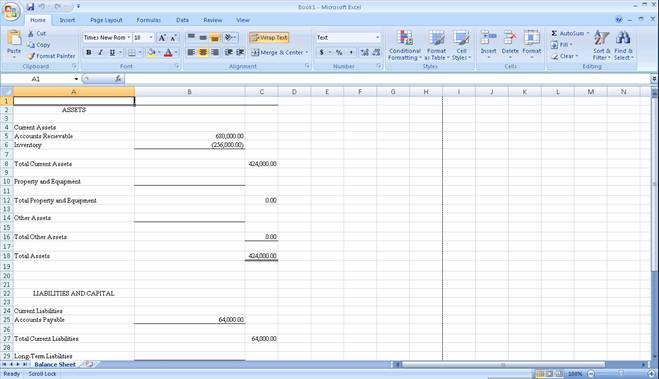
In above shown window we will select time frame period for which the balance sheet data we require. Now as we select the time frame the following format of balance sheet will appear:


Now if we want to see the detail of any asset or liability then we double click on that specific account with the cursor that is shown in form of zoom.


In the above mentioned window we took an example of ‘Accounts Receivable’. We can see the complete report of accounts receivable.


In order to create the report in ‘Microsoft Office Excel Sheet’, we click on “Excel” option located at the top of particular statement. In the above shown window we click ‘OK’ and the following below excel file of the particular financial statement will be created:


The same is the process to see any of the financial statements.


PEACHTREE -- Vendor Credit Memos

Vendor Credit Memos
Vendor credit memo is used when purchased goods are returned to the vendor.
For ‘Vendor Credit Memos’ we click on task at menu bar and click ‘Vendor Credit Memos’.


As we select ‘Vendor Credit Memos’ option the following window will appear:


The above window includes following two tabs:
1.       Apply to invoices
2.       Apply to Purchases

First in the tab of “Apply to Invoices”:
Ø We select a vendor to whom we are returning goods.
Ø Now we select an invoice number.
Ø Now we select a date on which we returning goods.
Ø Then we enter credit number. This is used because of how many times goods have been returned to the vendor.
Ø Now we enter quantity or number of units which are to be returned.
Ø Then we select GL account. For that raw material ledger account will be selected for manufacturing business and Inventory account for trading business.
Ø Now total amount will be automatically calculated when returning number of units is entered.
After we are done with the data we click “SAVE” button.
For the tab of “Apply to Purchases” is used when we purchased goods directly.
In this tab we select a vendor from which we have purchased goods directly.
Now we enter the same details as we have entered in ‘Apply to Invoices’.
When we are done with the data we click “SAVE” button.

PEACHTREE -- Credit Memos

Credit Memos
Credit memo is used when goods are returned back by the customers to us.
For ‘Credit Memos’ we click on task at menu bar and click ‘Credit Memos’.


As we select ‘Credit Memos’ option the following window will appear:


The above window includes following two tabs:
1.       Apply to invoices
2.       Apply to sales

For the tab of “Apply to Invoices”:
Ø First we select customer id who are returning goods to us. Then tab auto shifts from ‘Apply to Sales’ to ‘Apply to invoices’.
Ø Now we select an invoice number against which we are receiving goods from customer.
Ø Select date on which customer is returning goods. 
Ø Enter credit number.
Ø Enter number or quantity of returned goods.

After entering all information we click “SAVE” button

For the tab of “Apply to Sales”:
Ø We select customer id.
Ø Then the tab shifts but we have to click on apply to sales tab.
Ø Enter information about goods that are being returned by customer as these returned goods were sold to the customer directly not on invoice.

When we are done with the data we click “SAVE” button.

PEACHTREE -- Payments

Payments
We click on ‘Task’ in menu bar and click on “PAYMENTS”.


As we select payments, the following prompt window will appear:


In the above prompt window we will have to select a cash account for the use of particular payment transaction. Now as we click ‘OK’ the below default payment window will appear:


The above displayed payment window includes two tabs:
1.     Apply to Expenses
2.     Apply to Invoices
First in the tab of ‘Apply to Expenses’ payments will be for expenses. Here,  
Ø Enter the name of expense in ‘Pay to the Order of’.
Ø Enter check number.
Ø The date of payment is entered.
Ø In case of Apply to Expenses we don’t enter quantity, item, and unit price. But we enter detail of an expense in description.
Ø Enter GL account of particular expense.  salaries expense account.
Ø Enter total amount of expense and click ‘SAVE’ button.
In this way the payments are made for expenses.
Now in the tab of ‘Apply to Invoices’ when we select a vendor then ‘Apply to Expenses’ tab automatically shifts to ‘Apply to Invoices).
Now here ‘invoice’, ‘due date’ and ‘amount due’ will automatically be displayed because we have made purchase already from the particular vendor. So we have to enter description.  
Now we enable pay box in the pay column.
After this we click ‘SAVE’ button.
In this way the payments are made for invoices.- 

PEACHTREE -- Purchase/Receive Inventory

Purchase/Receive Inventory
First of all go to task menu bar and click on “purchase / receive inventory”.


The below window will appear as we select purchase/receive inventory:


The above window contains two tabs. First is “apply to purchases” tab. In this tab includes the following:
Quantity: (The total quantity received will be entered.) 
Item: (The ID of receiving inventory will be entered.)
Description: (After entering the ID here the name of inventory will displayed.)   
GL Account: (The GL account of raw mwterial inventory will be displayed.)
Unit price: (The unit price of that perticuler inventory will be entered. )
Amount: (The total amount of inventory received will be displayed here.)

The second tab is “apply to purchase order number”. In this tab includes the following:
Item: (The total number of inventory item receiving will be entered)
Remaing: (The remaining amount of goods will be displayed.)
Received: (The total number of goods received will be entered here.)
Description: (The name of inventory item will automatically be dispalyed.)
GL Account: (Here the GL account ID for raw material inventory will be selected.)
Unit price: (The unit cost of that perticuler inventory item will be entered here.)
Amount: (The total amount of that product will be displayed here.)      

PEACHTREE -- Purchase Order

Purchase Order
We go to the task menu and click on “Purchase order”.


As we select ‘Purchase Order’ in task menu, the following window will appear:


The above window includes:
Ø Vendor ID:  (Here the ID of vendor will be entered to whom we are sending purchase   order. It will be selected from already available of vendors this list can be viewed by clicking on magnifier glass. )   
Ø Purchase order: (This is used to switch between multiple purchase orders.)
Ø Date: (Here the date will be entered at which we are sending purchase order to vendor.)
Ø Good thru: (The date on which we will receive goods from vendor.)
Ø PO NUMBER: (This will be any serial purchase order number.)
Ø Quantity: (Here the required quantity of goods will be entered.)
Ø Received: (We can see this column when we receive inventory in future.)
Ø Item: (Here the ID of item will be entered for which we are going to send order.)    
Ø Description: (Here the name of document will automatically be appeared after entering the ID of product)
Ø GL Account: (Here the ID of Account receivable will be entered)
Ø Unit price: (Here the unit price of the product will be entered)
Ø Amount: (After entering the unit price the total amount will automatically be appeared)

PEACHTREE -- Receipts

Receipts
First of all go to task bar menu and click on “Receipts”.


The below window will appear as we select ‘Receipts’:


In the above window we will have to select cash account to be used for a particular transaction. And after selecting cash account we click ‘OK’ and the below default window will appear:


In the above window we have following options:
Ø Deposit ticket ID: (Here the will be entered that displayed on the receipt that we have used to deposit money in the bank)
Ø Reference: (Here the number will be entered that was printed on the check or in other mode of payment that we have received from our customer)
Ø Receipt Number: (Here we will enter the number that we want to be displayed on our generated receipt first time we will entered any number suppose 100 then each next time it will be incremented by one each time )
Ø Date: (Here we will enter the date on which we are receiving the amount.)
Ø Receipt Amount: (Here the total amount will be entered of this receipts)
Ø Payment method: (Here the payment method will be entered it could be cash, check, Visa, master card etc.)
Ø Cash account: (Here we will entre the possible account heads for cash it could be cash, bank etc)
Ø Cash Account balance: (Here there is a dollor if we press this dollor sign then in this field the total calculated amount will be displayed.)


Now as we select a customer ID, there will be two tabs parallel to each other captioned as “Apply to Invoice” & “Apply to Revenue”
By default second tab “Apply to Revenue” is selected. The difference b/w both is that     
Ø Apply to Invoices: (We will select this tab if we sent an invoice to a customer and want to apply a receipt to the invoice.)
Ø Apply to Revenues: (We will select this tab if we made a direct sale and we don’t want to generate an invoice.)
Ø Quantity: (In this column we will enter the quantity of the item whose receipt we want to generate.)
Ø Item: (In this column we will enter the ID of the item.)
Ø Description: (Here the name of the item will automatically be displayed after entering the ID of item.)
Ø Unit price: (Here we will enter the unit cost of the item that we have already sold.)


PEACHTREE -- Sales / Invoicing

Sales / Invoicing
Here we click on “Sales/Invoicing” in ‘Task’ menu of menu bar.


As we click on “Sales/Invoicing” in ‘Task’ menu of menu bar, the following default window will appear:


The above window contains two tabs:
Ø Apply to Sales Order.
Ø Apply to Sales.

As we will select the customer’s ID, if there is any sales order issued to that customer than the tab “Apply to sales order” will also be enabled. Otherwise only the tab above displayed tab of “Apply to sales” will be enabled.


Now as we select a customer id for which sales order has been made. Then tab will be shifted to ‘Apply to sales order’ and sales order detail menu is also shown.


Now in above window we select a respective sales order number from this menu. The details will be shown of sales order:
In these details we can alter shipping units/items. Those are to be actually sold.
We have to enter following detail:
Ø  Invoice no.
Ø  Date: (The date on which sales / Invoice detail was prepared in books.)
Ø  Ship Date: (That date is entered on which goods are to ship.)
Ø  Sales Rep: (Person who will perform this activity)
Ø  Terms: (Discount rate and conditions are entered)
After entering all above information we click on ‘Save’.


Convert Quote to Sales Invoice
In this method first we have to make quotations. And then we directly convert quotations into sales invoice.


After making quotations we click on ‘OPEN’ button in Quotation window. And select a quotation which is to be converted into sales invoice.


Now we click on ‘CONVERT‘ button and we select an option of Sales/Invoice. After selecting it we enter invoice number and then press “OK”. Now quotation has been converted into Sales/Invoicing.